Express Tools of GstarCAD 2012Extended Version-Arrange Tool
GstarCAD2012 Extended provides an Arrange Tool to solve the arrangement problems perfectly.
In the CAD design, designers always need to arrange the locations of objects. Occasionally, they have to locate the objects manually. Although it is an easy way, when designers need to arrange huge amount objects, it will be complicated and easy lead to errors. For this purpose, GstarCAD2012 Extended provides an Arrange Tool to solve the arrangement problems perfectly.
This tool can arrange multiple objects according to specific row spacing or/and column spacing. There are many patterns of arrangement; they not only can choose a set of arrangement references, but also can easily specify the region of the arrangement. Besides, it is much convenient for users to preview the result of the arrangement in real-time. By this tool, many kinds of arrangement will be realized according to different arrangement references and regions.
First, users have to select Arrange Tool in the tool bar of Edit; the dialog box of Arrange Tool will pop up.
The Arrange Tool has 3 functional areas: Horizontal, Vertical and Region. The usage of these functions is as below:
1. Horizontal
This tool provides 4 options for users, they are: Left horizontal arrangement, Middle horizontal arrangement, Nearest side horizontal arrangement and Right horizontal arrangement.
This arranges the selected objects horizontally, taking the leftmost object as arrangement reference. This option can be combined with others such as region and vertical options to get different arrangement effects. Also you can specify spacing between objects inputting a desire value to place the objects at exact locations.
Middle horizontal arrangement: This arranges the selected objects horizontally in two ways (top or bottom left object).
In the picture below, notice that there are three objects enclosed by a boundary, select first: specify spacing option and then select: middle horizontal arrangement. Then the selected objects will be moved horizontally according to the middle of the leftmost object (object number 1) as reference.
2. Vertical
The difference between Horizontal and Vertical is the different directions. The Horizontal arranges the objects along the X; the Vertical arranges the objects along the Y.
3. Region
(1) Specify Spacing
Also when you combine these two options, you can specify spacing between objects inputting a desire value. First select specify spacing option, then check nearest side horizontal arrangement option and input a value non-zero besides column and you will see how the objects will be spaced:
(2) Specify Region
This option can be combined with any horizontal and vertical options by specifying the start and end points of the new region. After this, the objects selected will be arranged according to the new region.
(3) Specify Boundary
After selecting objects, the arrange tool dialog box pop up, this option is selected by default, so just we need to select any horizontal or vertical arrangement option. And the objects selected will be arranged horizontally or vertically and equidistant each other according to the boundary.
Download GstarCAD2012 Extended Version at: http://www.gstarcad.net/cad_143_96.html
Featured Product

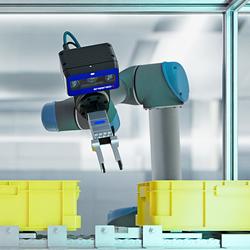
3D Vision: Ensenso B now also available as a mono version!
This compact 3D camera series combines a very short working distance, a large field of view and a high depth of field - perfect for bin picking applications. With its ability to capture multiple objects over a large area, it can help robots empty containers more efficiently. Now available from IDS Imaging Development Systems. In the color version of the Ensenso B, the stereo system is equipped with two RGB image sensors. This saves additional sensors and reduces installation space and hardware costs. Now, you can also choose your model to be equipped with two 5 MP mono sensors, achieving impressively high spatial precision. With enhanced sharpness and accuracy, you can tackle applications where absolute precision is essential. The great strength of the Ensenso B lies in the very precise detection of objects at close range. It offers a wide field of view and an impressively high depth of field. This means that the area in which an object is in focus is unusually large. At a distance of 30 centimetres between the camera and the object, the Z-accuracy is approx. 0.1 millimetres. The maximum working distance is 2 meters. This 3D camera series complies with protection class IP65/67 and is ideal for use in industrial environments.
